The Structure window is always either in the Draw state or the Animate state.
In the Draw state, the Draw menu is enabled.
In the Animate state, the Animate menu is enabled
This menu is also displayed when the Structure window is in the Draw state. and you right-click in the graphics area.
This command is checked when the Structure window is in the Draw state.
Initiates shapes animation using shape data from a single Animation Source .
The current Animation Source (Data Block, Shape Table, or Acquisition window) is displayed in the Animation Source list ![]() on the Structure window Toolbar.
on the Structure window Toolbar.
Animation can also be initiated by executing Tools | Animate Shapes from any Data Block, Shape Table, or Acquisition window.
The structure model must have Animation equations at one or more Points.
An Animation Source (Data Block, Shape Table or Acquisition window) must be open in the Work Area.
If the Animation Source is a Data Block or Acquisition window, animation depends on which Animate | Method command ![]() is checked;
is checked;
If Animate | Method | Sweep is checked, the cursor is swept through the Data Block or Acquisition window, and the Trace values (M# s) at the cursor position are displayed as the shape.
If Animate | Method | Sine Dwell is checked, the Trace values at the cursor position are modulated by sine wave values (ranging between -1 & +1) to give the shape a sinusoidal motion.
If Animate | Method | Stationary Dwell is checked, the Trace values at the cursor position are displayed as the shape without modulation.
If the Animation Source is a Shape Table, animation depends on which Animate | Method command ![]() is checked;
is checked;
If Animate | Method | Sweep is checked, each shape in displayed in Sine Dwell animation, followed by the next shape in the Shape Table.
After the last shape is animated, animation continues using the first shape.
If Animate | Method | Sine Dwell is checked, the selected Shape DOFs (M#s) are modulated by sine wave values (ranging between -1 & +1) to give the shape a sinusoidal motion.
If Animate | Method | Stationary Dwell is checked, the selected Shape DOFs (M#s) are displayed without modulation.
The shape data that is displayed during animation depends upon which data is displayed in the Animation Source.
If Display | Real ![]() is checked, only the Real part of the Trace or Shape DOF data is animated on the structure model.
is checked, only the Real part of the Trace or Shape DOF data is animated on the structure model.
If Display | Imaginary ![]() is checked, only the Imaginary part of the Trace or Shape DOF data is animated on the model.
is checked, only the Imaginary part of the Trace or Shape DOF data is animated on the model.
Otherwise complex (Magnitude & Phase) shape data is animated.
Click on any Data Block, Shape Table or Acquisition window to make it the current Animation Source.
Or choose a Data Block, Shape Table or Acquisition window from the Animation Source List to make it the current Animation Source.
See the Tools | Create Animation Equations command description in the Data Block commands chapter for details.
If M#s are selected, then only shape data for the selected M#s is displayed in animation.
Execute one of the Edit | Select M#s commands in a Data Block or Acquisition window to select (M#s
Execute one of the Edit | Select DOFs commands in a Shape Table window to select shape DOFs (M#s).
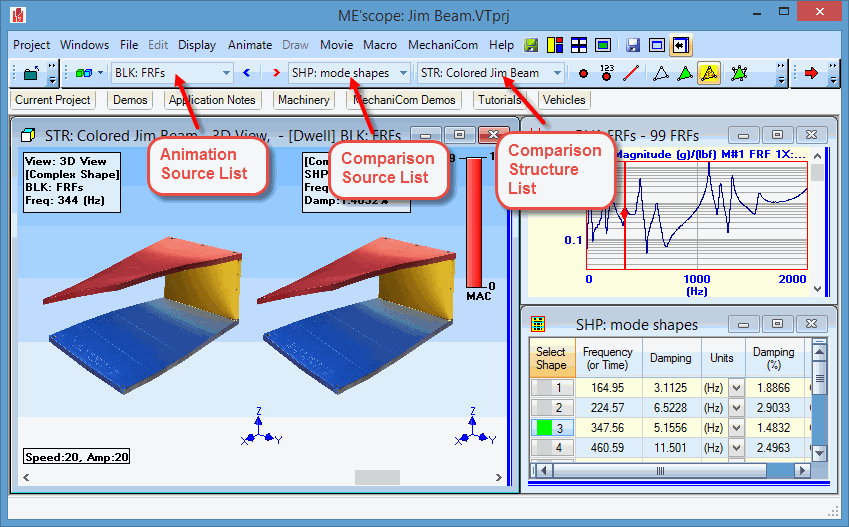
Displays shapes from two Animation Sources on two structure models together in animation.
This command is only enabled when two or more Animation Source windows are open in the Work Area
Shapes from the Animation Source list are displayed on the left-hand structure model
Shapes from the Comparison Source list are displayed on the right-hand structure model, which is selected from the Comparison Structure list
Use the Comparison Scroll Bar for moving the two structure models closer together or farther apart
Comparison Animation With Sources Arranged on Right.
The Comparison Source positions are controlled from the Animation tab in the File | Structure Options dialog box.
Check Sources Below Structure window to display the two Animation Source windows below the Structure window.
Check Sources Right of Structure window to display the two Animation Source windows to the right of the Structure window.
Shows (or hides) the Drawing Assistant tabs above the Substructures spreadsheet in the Structure window. Refer to Using the Drawing Assistant for details on the use of the Drawing Assistant.
Used to graphically number the Points on a structure model.
Point Labels are used for Point numbering.
Point Labels can also be manually entered into the Points spreadsheet.
Point numbering is required before using the Match Structure and Source DOFs option in the Draw | Animation Equations | Create Measured Equations command dialog box.
When this command is executed, the Number Points dialog box is opened, as shown below.
Click near a Point to number it using the Next Point number in the dialog box.
Check the Clear box, and click near the Point to clear its Label.
Click on Clear All to clear all of the Point Labels.
Each time a Point is numbered, the Next Point number is increased by "1" in the dialog box.
The Next Point number can be edited at any time during Point numbering.
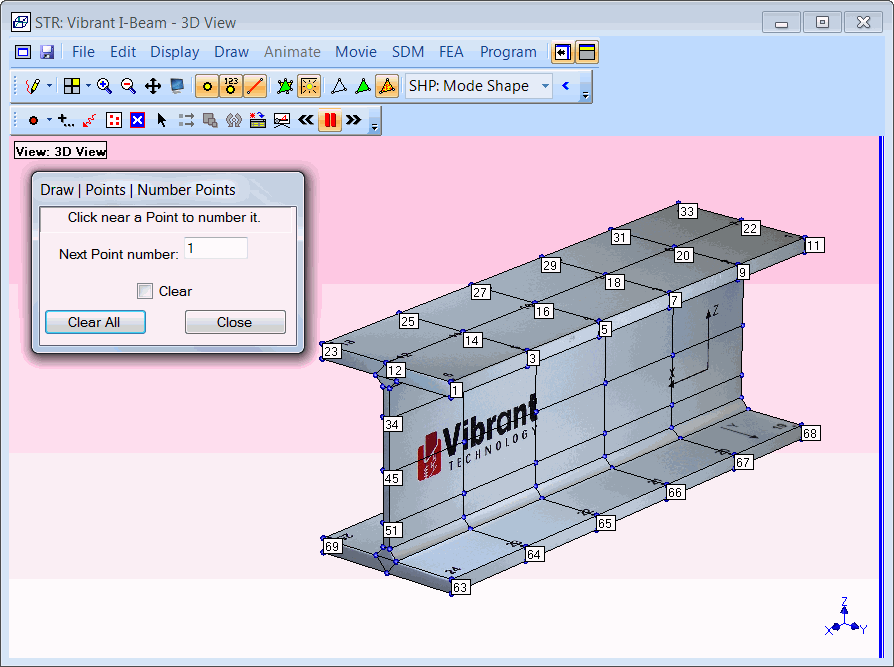
3D View During Point Numbering.
Sorts (re-orders) Points in the rows of the Points spreadsheet according to their Labels. Points are sorted in the following order;
Points with numbered Labels
Points with non-numeric Labels
Points with no Labels.
Sorting does not change the structure model, or the definitions of the Points on the model.
Adds a new Point to a Line. The original Line is replaced with two new Lines.
Click near a Line to select it and add a Point to the selected Line.
To re-position the new Point along the Line, do not release the mouse button after the Point is added.
Drag the new Point to its desired position along the Line before releasing the mouse button.
Adds a new Point to a Surface Triangle or Surface Quad . The original Surface is replaced with new Surfaces.
Click near a Surface to select it and add a Point to the selected Surface.
To re-position the new Point on the Surface, do not release the mouse button after the Point is added.
Drag the new Point to its desired position on the Surface before releasing the mouse button.
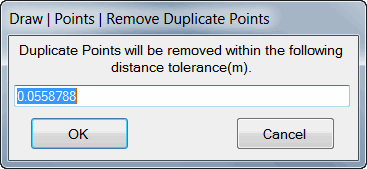
Removes all duplicate Points from the structure model.
When this command is executed, the following dialog box is opened;
Enter a distance tolerance for removing duplicate Points, and click on OK.
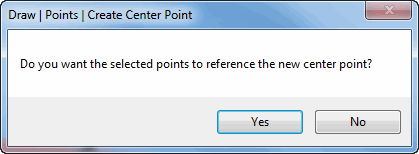
Creates a new Center Point at the geometric center of all selected Points or of a selected Substructure .
The new Center Point is added to the Points spreadsheet as a Bold Point.
The coordinates of the new Center Point are calculated as the average of the coordinates of all of the selected Points.
If a Substructure is selected, the coordinates of the new Center Point are calculated as the average of the coordinates of all of the Points referenced by the selected Substructure.
When this command is executed, the following dialog box will open;
Click on Yes to add the new Point to the Center Point column in the Points spreadsheet for the selected Points.
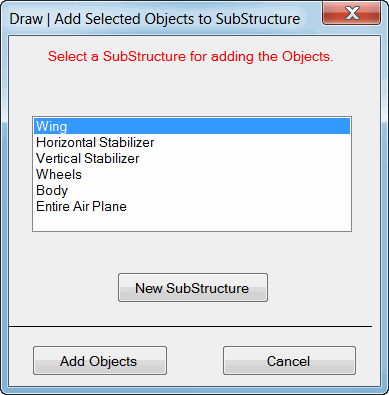
Creates a new Substructure or adds selected Objects to an existing Substructure.
If Points are added to a Substructure, all of the Objects that reference the Points as end Points are also added to the Substructure.
If Objects other than Points are added, the end Points referenced by the Objects are also added to the Substructure.
If a Substructure is selected, all of the Objects referenced by the Substructure are added to the new Substructure.
A Substructure only references other Objects. The referenced Objects still exist as unique Objects on the structure model.
When this command is executed, the following dialog box will open;
Choose an existing Substructure, or click on New Substructure to create a new one.
Click on Add Objects.
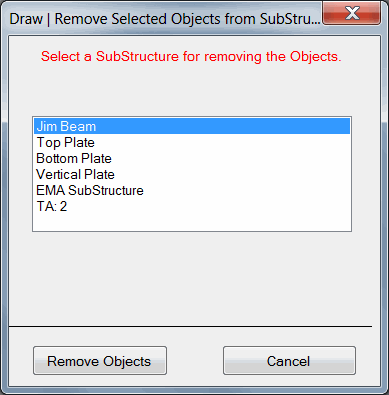
Removes selected Objects from an existing Substructure on the structure model.
Objects are not removed from the structure model when this command is executed.
When this command is executed, the following dialog box will open;
Choose a Substructure from which to remove the selected Objects, and click on Remove Objects.
Changes the size or shape of all selected Objects.
Execute Edit | Resize Objects ![]() to enable the Resize operation.
to enable the Resize operation.
Move the mouse pointer into the View where the Resize operation is to take place.
The mouse pointer will change to a Resize pointer when it enters a View.
Click & drag to re-size the selected Objects.
During a Re-size operation,
Hold down the F2 key and drag to re-size only in the horizontal direction.
Hold down the F3 key and drag to re-size only in the vertical direction.
Hold down the F4 key and drag to re-size in both horizontal & vertical directions.
Click & drag the mouse pointer to the right to increase the size, or to the left to decrease the size.
Changing the Size of a Cylindrical Substructure .
The size of a selected Object will change in the direction that you drag the mouse pointer, thus changing its shape.
Changing the Shape of a Cylindrical Object.
Select Points with Icons (see Points Spreadsheet)
Execute Edit | Resize Objects and click on Yes in the dialog box that opens.
Changes the position of all selected Objects in a structure model by dragging them in a View.
Execute Edit | Drag Selected Objects ![]() to enable the Drag operation.
to enable the Drag operation.
Move the mouse pointer into the View where the Drag operation is to take place.
The mouse pointer will change to a drag pointer when it enters a View.
Click & drag the selected Objects in the View.
During a Drag operation,
Hold down the F2 key to drag the selected Objects in the horizontal direction only.
Hold down the F3 key to drag the selected Objects in the vertical direction only.
Hold down the F4 key to drag the selected Objects on a diagonal line in the View.
Rotates all selected Objects about the global (X, Y, Z) axes.
When this command s executed, the following dialog box will open.
Enter the Rotational Increment in degrees.
Click on the Up/Down Arrows next to the axis about which rotation is desired.
Press the Close button.
When Objects are rotated, their coordinates in the Points spreadsheet are changed.
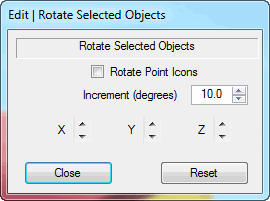
Rotate Selected Objects Dialog Box.
Select Points with Icons (see Points Spreadsheet)
Execute Edit | Rotate Selected Objects and check Rotate Point Icons in the dialog box.
The commands in this menu are used to mesh (subdivide) all (or selected) Objects on a structure model.
All original Objects are replaced by new Objects of the same type.
The following types of Objects can be meshed,
Line Objects: Lines (and FEA Springs, Dampers, Rods, and Bars).
Triangle Objects: Surface Triangles (and FEA Plates).
Quad Objects: Quad Surfaces (and FEA Quad Plates).
Substructures: All Line, Triangle, and Quad Objects referenced by a Substructure .
The term "edge" refers to either a Line Object or the edge of a Triangle or Quad Object.
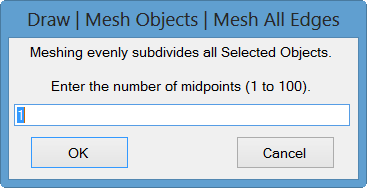
Subdivides the edges of all selected Objects using a number of evenly spaced midpoints.
Meshing a Line Object divides it into equal segments.
Meshing a Triangle or Quad Object evenly subdivides each of its edges.
When this command is executed, the following dialog box will open. The number of midpoints is the number of Points that will be added between the endpoints of each Line Object or Surface Object edge.
Enter the number of midpoints, and click on OK.
Meshes the longest edges of all selected Objects. This command ensures that only the "long edges" of an Object will be meshed.
Edges are meshed so that no edge is longer than half of the longest edge found among all of the selected Objects.
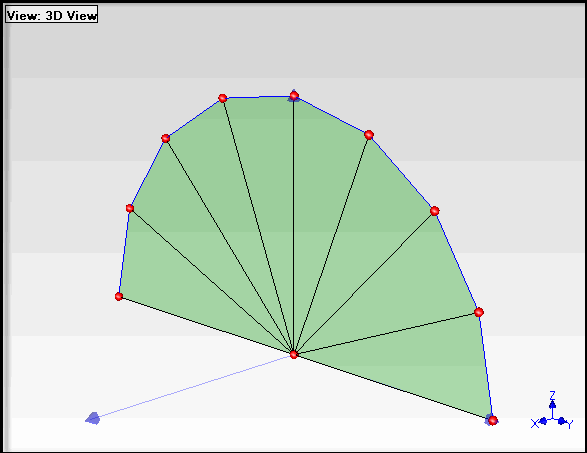
Before Meshing Longest Edges.
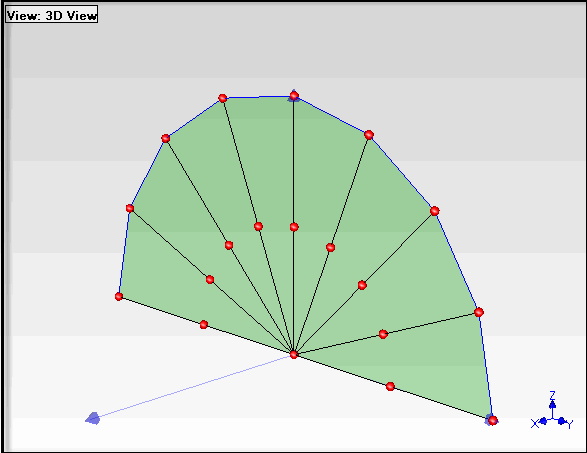
After Meshing Longest Edges.
To ensure that all Line & Surface Objects are properly meshed, it is better to create a new Substructure with all of the Line & Surface Objects in it, and then mesh the Substructure.
Select all of the Points being referenced by the Objects to be meshed.
Execute Draw | Substructure | Add Objects to Substructure.
Click on New Substructure in the dialog box that opens, and enter a name for the new Substructure into the box that opens.
Select the new Substructure and mesh it.
If all of the Points referenced by the Objects to be meshed already have Assigned M#s, then M# Interpolations will be automatically created for all of the new mesh Points when one of the Mesh commands is executed. This allows you to start with a simple (stick or surface) model with only a few Assigned M#s, and create a meshed model with many more Points, including their Assigned M#s. To use this feature,
Assign M#s to all DOFs of the simple model.
Mesh the simple model to add more Points together with their Assigned M#s.
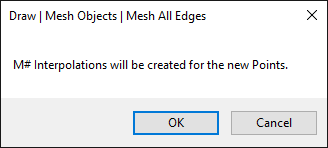
If M#s were already Assigned for the Points on the Objects to be meshed, then during meshing the following dialog will open informing you that M#s will be Assigned all of the new Points.
A short-cut method for animating shapes on complex photo realistic models or solid models with many Points is to first animate them using a simple model, and then use M# Interpolation to animate the additional Points of the complex model. The following steps outline this process,
Construct a simple model using only enough Points for the measurement Points on the test article
This model can consist of each measurement Point "floating in space" near the measurement Point on the complex model
Animate the shape data on the simple model
Mesh the simple model to create more nearest neighbor Points for M# Interpolation on the complex model.
Execute Draw | Assigned M#s | Interpolated to Measured DOFs on the meshed simple model
Use the Draw | Edit and Draw | Drawing Assistant commands to superimpose the complex model on the simple model in the same Structure window
Execute Draw | Assigned M#s | Interpolate between Measured DOFs on the complex model to create M# Interpolations from the Assigned M#s the nearest neighbors on the simple model