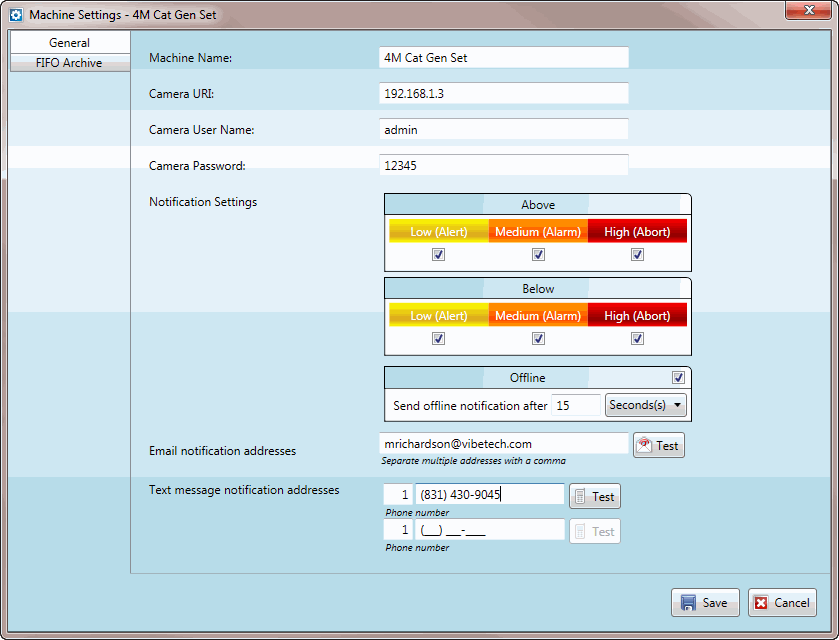
Enter the Camera URL, for example 192.168.1.3
Enter “admin" as the Camera Username
Enter "12345" as the Camera Password
NOTE: The (optional) Ethernet surveillance camera must be connected to a Power Over Ethernet (POE) box that supplies power to the camera, and also must be connected via an Ethernet cable to the Windows network router that also hosts the Archival Database
Before the Panasonic camera can be used with a network router, you must first configure it using the “EasyIPConfig” software on the installation CD provided with the camera. To configure the camera, you must connect the camera to your PC.
Set the IP address for the wired connection on your PC to “192.168.10.20”, and connect the camera to the wired Ethernet connection of the PC using the POE box.
Start the “EasyIPConfig” application from its installation CD.
You should see the camera listed in the main window of the application.
To verify its function, select it from the list, and click on the “Access Camera” button.
This will start an internet browser so that you can view the output of the camera. This action will require that you allow the camera to download and install some software onto your computer.
Follow the prompts to setup the camera software, and provide access through your fire wall.
After you have verified the camera's function, you can configure it for use with the network router.
Make sure the camera is selected in the “EasyIPConfig” list, and click on the “Network Settings” button.
Configure the camera with a fixed IP address; “192.168.1.151”. Follow the directions in “EasyIPConfig” to do this.
You may also want to consult the manual for the Panasonic SV-SW175 camera for more information.
After the fixed IP address is set, the camera is configured.
After the camera re-boots, disconnect it from the PC and connect it to the network router.
The camera's output can now be viewed wirelessly from external computers, and from the Console software.
NOTE: To display camera images in Console, the camera must be assigned to a Machine (Site or Test Article) in the Archival Database
To assign the camera to a Machine (Site or Test Article),
Start the Console software
Open a machine tab from the Machine (Site or Test Article) Gallery
Click on Settings on the Home ribbon
The Settings window will open, as shown below:

Enter the Camera URL, for example 192.168.1.3
Enter “admin" as the Camera Username
Enter "12345" as the Camera Password
NOTE: If you change the user name & password values when you configure the camera, enter the same user name & password in this Settings window.
After these fields have been edited,
Click on the Save button.
Images from the camera will now be available in the Console for the Machine to which the camera was assigned.
After a camera has been assigned to a Machine (Site or Test Article), to display a live camera image in the Machine (Site or Test Article) Gallery,
Check Display Camera for the assigned Machine (Site or Test Article) in the Gallery